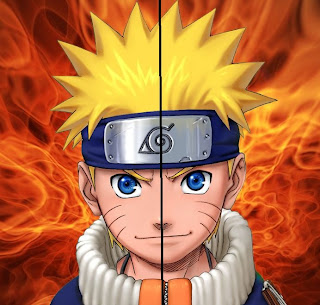
How to draw a face, that is the next lesson, so you must think yay Finally he finally will teach us how to draw anime yay, XD well in the next lessons I won't use my art work because it would be tricky so with anime images that I found I will explain how to draw anime so first of all you must know about the face proportions, in the human body before you get started, the face is like a mirror one half of the face is exactly the same as the other one thing that I will explain with a naruto image, why I use a famous character instead of mine, just for a simple reason I don't want you to copy my style XD no seriously I think that with famous character you can learn a little more easy because all the creators of this animes have a particular way to do the things so this time I will explain how to draw a face using this method, so in the next image you can see what I'm talking about
Now a head is composed by a circle, just a simple circle, now that circle is cut by half with a line in the middle separating the circle in two, like this
Now with this done we locate the eyes with an horizontal line in the circle like in the middle, and for the nose and the mouth is the same something like this
Now with this done you must do the jaw now in the end of the line you do an horizontal line in the exact point that you will place the chin how do you find the exact distance between the circle and the line well usually the distance is the same between the eyes and the bottom of the circle, something like this
I don't know if you can understand it but the line right below the eye is actually two lines with the same length that's how you find the distance, now after you place the line you must do the jaw, how? first you do a line with some kind of an angle a slight angle and the another one connected to that one but this one with a line with an angle a little high from the other one, connected to the line of the center, that is what you should do with the other half something like this
Now for the eyes I usually do a circle or an oval it depends on the shape of the eye and I'll do it most because to determinate the length of the eye and it's more easy at the moment that you add the final details, remember to make the line as soft as you can because if you make a mistake you can erase and it won't leave a mark and for the eyebrows I do a line to place it, something like this
Now for the ears I do another circle, that's why in the previous lesson I told you that you should master the shapes first before you get started, so for both of the ears in this case the ears are a little before the start of the nose something like this
Now to place the hair this is something important the hair doesn't end in the circle it ends above the circle I usually made a weird shape according the hair just to place the exact point in this case is sort of a circle, something like this
Now that I had all located then I proceed to add the details like the eyes or the hair, and finally having the a result like the original picture in this case, now for the beginners I recommend in the image that you want to draw do this steps with paint it would be more easy because of the lines you know it's a little tricky but with practice you'll master it.
Now a question that all must want to do is what about if I want to do a profile head or a head in other angle like looking up or down well that would be the next lesson for now I will end this lesson with a front head, so wait patiently the next lesson, if you want to contact me you can follow me on Twitter: @OreoCnMostaza, or you can email me to : alan.jaimes@gmail.com, if you have deviant you can leave me a comment at http://ajjds.deviantart.com

 10:30
10:30
 ErAgOxX3


 Posted in
No Response to "
Lesson 4 Faces
"