Mostrando entradas con la etiqueta How to draw anime. Mostrar todas las entradas

D. Gray man Innocence

I know, what you all are gonna say, finally he made an entrance yay, well as I promised here is the Tymothy Hearst Innocence Drawing, for the moments the next lesson is going to be published the next week, so don't worry. This week I'm busy with my final project for school and after that, I'm gonna be all yours XD, no seriously when that pain in the ass finish I will do more lessons, this time I don't have much to say so I'm gonna be quick and finishing this entrance I want to remember all of you that if you want to contact me you can do it with the new added  in the left of you monitor in the section of the followers and the translation button, or you can follow me on Twitter @Draw_with_me, yay I just changed my username XD


Happy New Year, Merry Christmas etx... XD

Hey everybody I'm back, this time I will say to everybody happy new year, merry Christmas, and happy Hanukkah for those who are Jewish, I know that it's a little late for this, but you know as I said I was busy and that was why I couldn't write here on the blog, well from now on I will post a new lesson every Saturday, so don't push me XD, if I didn't post the lesson by Saturday, check on Sunday, Maybe I fall asleep and I forgot it, so the next lesson will be about the feet, I know that I promised that I will post an entrance about different models of hands to practice so don't worry that will come XD so I will see you soon in another entrance


How to draw Zeon Bell Final Result

This is the full image of the artwork of Zeon Bell so I hope you guys like it :)


How to draw Zeon Bell

Hey guys, this time I won't make a lesson, but I will give you a tutorial made by me about how to draw zeon bell from konjiki no gash bell, well known here in America as Zatch Bell, one of my favorite series and this tutorial is made for one of the blog readers Ayumi Hitsu, this is one of my most important followers of the blog, later I will put the finale result of this artwork, remember you can follow me on twitter: @OreoCnMostaza, or you can send  me an email: alan.jaimes@gmail.com, remember never post any personal information on the internet and always use the internet with responsability, well another thing is that this year I won't put anymore lessons about how to draw anime like hands feet, or body.


Lesson 7 hands

Hey guys I'm back with another lessons, now I promise you to give you a lesson about how to draw hands, so in this lesson I will give you two different ways of doing hands, the first one is a more realistic way, and is just a simple hand, and the other one is more an anime style, though it's not a 100% anime but it's more anime, so I'm gonna start with the first example, now the first step is to do a simple square, that's right a simple square, as you can see on the next picture


Now after I did the square I made another square above the one I just did, with the exception that this one is going to be more like an oval, You'll see what I mean in the next picture, and I also made a sausage shape to indicate where the thumb is going to be

Now the next step is to indicate where the rest of the 4 fingers are going to be, so for that I divide the oval square, I don't know an specific word to describe that shape XD, by half, and then the other two half divide it by half, I don't know If I'm explaining well But I think you will once you see the next picture

Now the next step is to start to add the details, I added to diagonal lines in the first square to indicate where the wrist is going to be, now, I will start adding the details, now remember each finger is composed by 3 spots, called phalange another thing is that the four fingers have a different length.
The pinky is the smallest, next the thumb, next the ring finger, now the index finger, and the longest is the
middle finger, you can notice that with your own hand, and you can see it with the next picture

Now another thing you should keep in mind is in the anime the nails aren't detailed to much they mangakas just do like a curve line to suggest it, now you can change a little the size of the hand if you consider, that is too big or too small, so you can just work inside the lines if you think is too big, or work a little outside if you think is small, it's as you wish to do it, in my case I considered that the hand was to big so I re size it a little bit, now after I got all this, I should begin adding the inking and the shadows to get something like this, 
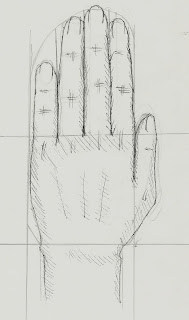
Remember this first example is more realistic, anime hands, usually don't have this kind of deatail, but you know you should know how to draw a little of each style, it can be helpful to you, now as you can see I used my own hand as a reference, so after you guys are done you can erase the guide lines, I let them this time but I usually erase them, so starting with the next example, I will do a hand more of the anime style, I will dop all the same steps, another thing I forgot to tell you earlier is that you can modify the steps at your own style, thing that I did with the next example
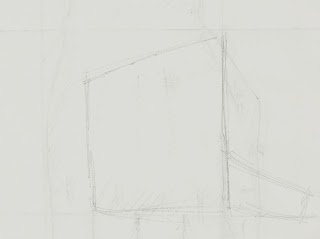
Another thing is if you are going to practice several times how to do a hand or anything else you don't have to use another sheet to draw it, you know I'm a little echo, so I don't like to waste paper because I could use it in something more important, now as you can see I did the square making the line where the fingers are going to be placed more diagonal, because this hand will look like if it's trying to catch or take something, now another thing you can see is that I place the thumb already, I'm sorry the time I have drawing made me have some habits, and I place it before, but that's ok that's no problem now I'm gonna place the rest of the fingers with some rectangles as you can see in the next image

I know it  doesn't look like If is trying to take something, but with the details is going to look better, now I will add the details, and I will ink the picture, because I don't want to make this lesson more longer, so in the next picture you will see the final results

I know I have that probably don't look like a anime hand but you know is less detailed that the first example, and that makes it more anime, but as I said before the anime hands don't have to much detail, So I'm finishing this lesson, and the next lesson will be about the eyes, so anyway remember that you can follow me on twitter: @OreoCnMostaza, or you can email me: alan.jaimes@gmail.com, and you can also add me on deviant watch at deviant art AJJDS, and I will be back with another one soon :D


Lesson 6 human body part 2

Hey guys today I'm gonna explain how to do a human body character, this time I will make a boy, I'm not gonna use my artwork yet, so anyway I will explain it with the main character of KHR! well know as Tsuna, so as you can see on the next image the character have more like a starting attack pose


Now remembering what I told on previous lessons I will explain it with some popular characters because it's easier to learn it, now first of all I should start by determinate the pose with my famous stick man as you can see next, remember I recommend that people must practice everyday, even if it's just a silly sketch

Now I'm not gonna explain the head because I already did with previous lessons, so the next step according to me, the order may change depending the person, is after I do the head, with this I mean that after I put the shapes that places the hair, eyes, nose, ears and mouth I start by making geometric shapes in the places I will place the parts of the body, it's like start to give the draw the basic shape, I don't know if you guys understand me but I thin you will understand when you see the next picture

I know it looks weird, but making geometric shapes in the legs arms, and chest that are equal to the width of the body part  you can after that add the details to finish our draw, and that's pretty much how you do a human body draw, just keep in mind that the draw it's not specific, it's just to give you an idea about how to do a human body, in the next lesson I will explain on a more detailed way the body parts like the nose, eyes, feet, mouth and hands, this is just a brief explanation about how to do it, and I want you to  practice because it will be indispensable for the time I explain on a very detailed way the human body, so the next lesson I will explain how to do hands, and I think I'll do it with my art work, so anyway this is just for a brief idea nothing else, on the next human body lesson I will explain it for boys and girls,now remember you guys can follow me on twitter: @OreoCnMostaza, or you can email me at: alan.jaimes@gmail.com, or you can add me on deviantwatch on deviant art: AJJDS, my other penname is Eragox but that name I only use it for games and for sign my draws, so I will back with another lesson real soon. :)


Ayumi Hitsu

Hola hablo ambos idiomas disculpa que me tomara todo este tiempo responderte, tuve que cerrar el otro blog porque no me dejaba acceder, cuando quieras puedo hacer un dibujo de zeon y subirlo exclusivamente para ti, no olvides recomendarme XD, no en serio me pondre al dia con el blog lo mas pronto posible, la verdad tuve problemas con la pagina y mi computadora y he estado ocupado pero no dejes de esperar una leccion pronto asi que si necesitas consejo o algo avisame.

Remember Followers of the blog I speak Spanish and English so if you guys wanna contact me just like Ayumi, I will be glad of hearing it, so once again my Deviant art is http://ajjds.deviantart.com/ there I have posted all my artwork if you guys wanna see it, so I'm really sorry to let you guys down with the blog, I had troubles with my computer just like I told Ayumi, so By the end of the day I will have another lesson posted :D


Lesson 6 human body

Hi guys it's me well today I will start with another lesson that you will find pretty interesting, so let's get started, so today I'm gonna talk about the human body proportions, with picture above, I know it's not perfect, but I made it with paint just to explain the human body proportions, so as you can see usually the body is composed with 8 heads tall, (more or less)  so when yo make a draw about anime you must know that, before you can get started, I know it's pretty boring this kind of lessons, because it's theory and you wanna get started drawing, I know what you feel I was the same when I started to draw, but with the theory you can make better draws than without the theory, so as I said the human body usually is 8 heads tall, making the arms, like 3 heads tall, remember the arm and the forearm are the same length like 1 head and a half, it must be placed in the shoulders( obviously XD ) and it must finish a little after the hips, the shoulders are the width of 2 heads, one fore each side, the hips and the waist start between the end of the arm and the beginning of the hands as you can see on the picture, the legs are the rest of the heads and the feet are the same width as the half of the leg not the thigh so having all this concepts clear I will finish this lesson for today, and I remember all my readers don't post any personal info on the internet because you don't know when you can find bad people that may hurt you so you must be careful, so remember if you wanna contact me you can follow me on twitter :@OreoCnMostaza, or you can send me an email alan.jaimes@gmail.com, I will be glad to receive suggestions about the next lessons and remember the picture above isn't perfect it's just an example, and now recap the body is 8 heads tall, the arms are 3 heads tall the legs are 3 and a half the feet are a half head and the head making a total of 8 the width of the shoulders is 2 heads and those are the human body proportions, so see ya in another lesson.


Lesson 5 Heads part 2

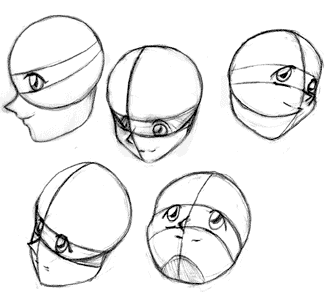
Well guys I'm back :) this time I will explain you how to draw heads in other positions, as you can see in the image

\

In the image that I don't own I just found it on google, you can see 5 different heads posses, if you want to draw a head again you start with a circle but the line that divides the head in two changes, instead of do a straight line in the middle you put the line according the position of the head, if you mastered the head in a front position you can do this one easily so following the guide above  I will give you an example about how to draw a head with a different position a 3/4 position with the next video that I made myself I'm not gonna lie to you this is a bad quality video I just record it and I made the illustration in paint so it's not perfect, when we continue with the next lessons I will use my art work so don't worry you'll see it. XD 


Lesson 4 Faces

How to draw a face, that is the next lesson, so you must think yay Finally he finally will teach us how to draw anime yay, XD well in the next lessons I won't use my art work because it would be tricky so with anime images that I found I will explain how to draw anime so first of all you must know about the face proportions, in the human body before you get started,  the face is like a mirror one half of the face is exactly the same as the other one thing that I will explain with a naruto image, why I use a famous character instead of mine, just for a simple reason I don't want you to copy my style XD no seriously I think that with famous character you can learn a little more easy because all the creators of this animes have a particular way to do the things so this time I will explain how to draw a face using this method, so in the next image you can see what I'm talking about

Now a head is composed by a circle, just a simple circle, now that circle is cut by half with a line in the middle   separating the circle in two, like this

Now with this done we locate the eyes with an horizontal line in the circle like in the middle, and for the nose and the mouth is the same something like this

Now with this done you must do the jaw now in the end of the line you do an horizontal line in the exact point that you will place the chin how do you find the exact distance between the circle and the line well usually the distance is the same between the eyes and the bottom of the circle, something like this

I don't know if you can understand it but the line right below the eye is actually two lines with the same length that's how you find the distance, now after you place the line you must do the jaw, how? first you do a line with some kind of an angle a slight angle and the another one connected to that one but this one with a line with an angle a little high from the other one, connected to the line of the center, that is what you should do with the other half something like this

Now for the eyes I usually do a circle or an oval  it depends on the shape of the eye and I'll do it most because to determinate the length of the eye and it's more easy at the moment that you add the final details, remember to make the line as soft as you can because if you make a mistake you can erase and it won't leave a mark and for the eyebrows I do a line to place it, something like this

Now for the ears I do another circle, that's why in the previous lesson I told you that you should master the shapes first before you get started, so for both of the ears in this case the ears are a little before the start of the nose something like this

Now to place the hair this is something important the hair doesn't end in the circle it ends above the circle I usually made a weird shape according the hair just to place the exact point in this case is sort of a circle, something like this

Now that I had all located then I proceed to add the details like the eyes or the hair, and finally having the a result like the original picture in this case, now for the beginners I recommend in the image that you want to draw do this steps with paint it would be more easy because of the lines you know it's a little tricky but with practice you'll master it.

Now a question that all must want to do is what about if I want to do a profile head or a head in other angle like looking up or down well that would be the next lesson for now I will end this lesson with a front head, so wait patiently the next lesson, if you want to contact me you can follow me on Twitter: @OreoCnMostaza, or you can email me to : alan.jaimes@gmail.com, if you have deviant you can leave me a comment at http://ajjds.deviantart.com 


Lesson 3 Geometric Shapes

Ok to start this lesson and finally get started drawing you must be able to do geometric shapes o.O That's right geometric shapes why? because all the anime and manga draws are composed by these shapes, so you must master each one of these, this is not like a lesson it's like an exercise to do, master all this shapes. This blog will give you the tools in manga, In this lesson I'm telling you that you should be able to do this shapes not exactly the same as the picture above, no that picture is an example you must master shapes like a rectangle a square and a triangle so after you master it you can continue to the next lesson.


Lesson 2 Motivation

Now we can start with our lesson 2 motivation, O.O why the motivation? because at the beginning if you don't know how to draw you might get bored of this because you can't get any results, that's why I made this lesson to give you the tools to get over it, first of all there's no easy way to learn and there are NO SHORTCUTS, so if you want to learn on an easy way please stop reading my blog because you won't find it here, so if you agree with me the let's get going, now I will explain how we the artists can draw very good, draw is like write when you are learning to write your brain and your hand must work as one, it means that your hand when you're writing must make a replica about your thought it's like your hand must be capable of write what are you thinking so if you can do that writing when you are little then you can do it with the drawing, so to draw like a pro you must practice every day, ATTENTION!!! Not everybody has the same talent as we the artist so don't expect to learn at the same speed as a person that has the talent, a person without the talent can learn to draw but he can't do it perfectly so I'm just being honest with you not everybody can achieve a great level drawing but he or she can improve his abilities, so another point to cover is the self-esteem when you are learning to draw you might find a person that tells you that you are no good and you can't do it, a certain amount of people are telling you the truth but Hey! at the beginning there's no easy way to learn it and there's no fast way, you are the only one that can make his learning fast or slow, it depends of the time you invest, I decide to make this blog first of all I might find someone on the Internet that can give me tips to improve myself, and because I feel like if I had to give you all my knowledge in this area, like mark crilley does, it's like if I was born with this ability why I can tell to the world what I know, so Other thing the first pieces you do aren't going to be perfect, you can post your artwork at deviantart.com, and I'm not perfect drawing but I'm good and still I have to learn a lot of things so at a certain point we might learn together, I will post when I can, and the next 6 or 7 months my life is going to be a mess so don't ask me when I'll post my new entrance so be patient with me I'm not an expert but I can help you and remember I'm only sixteen, so after all I finally end this entrance and remember you can follow me on twitter: @OreoCnMostaza or you can email me: alan.jaimes@gmail.com so let's move on to the next lesson.


1st Lesson Lines

Ok first of all this blog is like a learn at the same as I do, so remember this blog it's not perfect like other how to draw tutorial like the one of mark crilley in my opinion one of the best manga artist of our time, and a person that I admire and from his tutorials I improved a lot my manga drawing skills, so to begin the first step to learn is making an asterisk O.O yeah that's right and asterisk, I don't wanna presume but my asterisks are very nice XD so what is the purpose of an asterisk, to discover in which direction you are good drawing lines in my case I'm good in a diagonal Line so do a simple asterisk like this one over here: 
and then watch which line is the prettiest and now you know in which line your draws are good. And this is how we end our first lesson and we are one step closer to our objective, learn how to draw manga, In this case I didn't use an asterisk made by me I just made it with paint just as an example. Remember If you want to contact me you can follow me on twitter: @OreoCnMostaza


Introduction of the blog

Ok guys well my name is Alan, I'm 16 years old and I create this blog with the purpose of learn how to draw anime at the same time you learn, I have experience drawing from years before, if you wanna see my art you can go to the next link, http://ajjds.deviantart.com/ I'm not going to post all my previous art works so in this blog you can give your opinion about a draw or ask about help if you have trouble with something so if you guys need an advice about how to draw something, Oh and I almost forgot this blog is only for anime so if you guys wanna contact me you can follow me on twitter: @OreoCnMostaza, I know it's not the best username for a twitter account but is a way to contact me, I will give follow back I'M NOT like those divas that has like 852656 followers and they aren't capable to give a follow back, so another way to contact me is by email, alan.jaimes@gmail.com don't ask me about when I'm going to post the next how to draw tutorial because my personal life goes first, so let's get started


powered by Blogger | For Blogservices